Recipes

Chunky O’Brien Potatoes


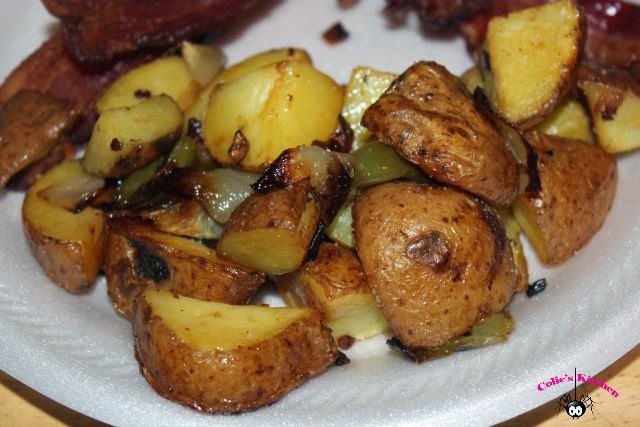
The original name of these potatoes is “the best breakfast potatoes ever” now I know why because they are the best breakfast potatoes ever! If you have ever bought O’Brien Potatoes in the grocery store these are very similar but better I mean over the top better.


Don’t fear making too many of these potatoes because it’s not possible. These would be awesome in a breakfast burrito or just simply with breakfast for dinner like we did. They even reheat well thank goodness!


I found these on the The Pioneer Woman’s site and as always they are great. Isn’t everything she makes awesome? Yes, I believe so!

You can’t beat this recipe because it’s wonderful and addicting.


Ingredients:
  • 2.5 Pounds Red Potatoes, Cut Into Chunks
  • 3 cloves Garlic, Minced
  • 1 whole Onion, Peeled And Roughly Chopped
  • 1 whole Green Bell Pepper, Seeded And Roughly Chopped
  • 2 tablespoons vegetable oil
  • 1/2 stick Butter, Melted
  • 1 teaspoon Seasoned Salt
  • Salt And Freshly Ground Black Pepper

Directions:

  1. Preheat the oven to 450 degrees F.
  2. In a large bowl, toss together the potatoes, garlic, onion, green bell pepper, oil, butter, seasoned salt, salt and pepper.
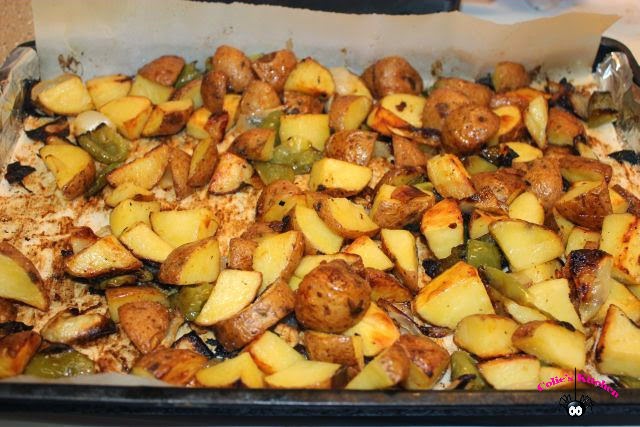
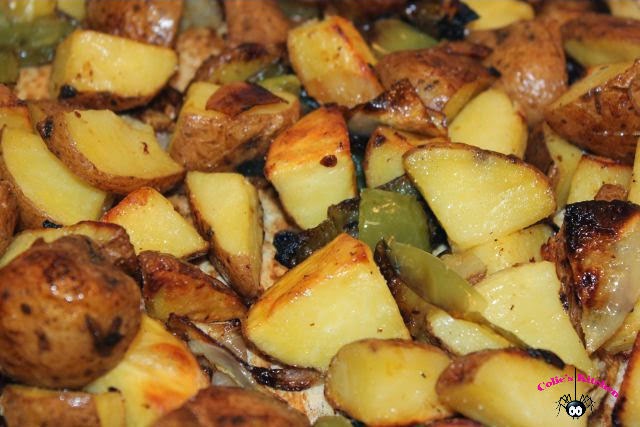
  3. Pour potatoes onto a lined (Parchment paper so it won’t stick) baking sheets. Bake for 20 to 25 minutes, using a spatula rotate the potatoes around after 20 minutes.
  4. Raise the heat to 500 degrees and bake until crisp and brown, 15 to 20 minutes, once again flip the potatoes to get even browning this should done every 5 minutes at this point.
  5. Sprinkle with a little more salt and pepper before serving.

Original Recipe Source

var pfHeaderImgUrl = ”;var pfHeaderTagline = ”;var pfdisableClickToDel = 0;var pfHideImages = 0;var pfDisablePDF = 0;var pfDisableEmail = 0;var pfDisablePrint = 0;var pfCustomCSS = ”;var pfBtVersion=’1′;(function(){var js, pf;pf = document.createElement(‘script’);pf.type = ‘text/javascript’;if(‘https:’ == document.location.protocol){js=’https://pf-cdn.printfriendly.com/ssl/main.js’}else{js=’http://cdn.printfriendly.com/printfriendly.js’}pf.src=js;document.getElementsByTagName(‘head’)[0].appendChild(pf)})();Print Friendly and PDF
Check Out Our Online Recipe Book: www.CafeChatterbox.com

Recipes

Whipped Sweet Cream


I wanted a whipped cream for a topping on pancakes but I knew I wanted to use some heavy whipping cream I had in the refrigerator. I am not a huge fan of your premade whip toppings. I prefer to make my own. This recipe fit the bill! It’s creamy and delicious and better than anything you will find in a refrigerated or freezer case.


This sweet cream recipe is super easy to make and should be a crowd pleaser just adjust to exactly what you are needing. I only needed one serving but you can easily double and triple this recipe.


Ingredients:
  • 1 cup heavy whipping cream
  • ½ teaspoon Mexican vanilla extract
  • 2 tablespoons confectioners’ sugar

Directions:

  1. *Tip* Place heavy cream in the freezer for about 10 minutes before you are ready to use it. This will insure your cream is super cold and will form quickly.
  2. In a blender add all the ingredients and blend until the cream forms peaks. Don’t blend more than a minute at a time or you will make butter instead of sweet cream. 
  3. Refrigerate until you are ready to serve.

Print Friendly and PDF
Check Out Our Online Recipe Book: www.CafeChatterbox.com

Recipes

Asian Ramen Coleslaw


I have been wanting to try this recipe for months! It’s one of those recipes that I found really intriguing. I think the idea of putting the Ramen Noodles in the slaw sounded cool. LOL I know it’s the little things right?

This recipe is very easy to put together and comes together very nicely. The Ramen Noodles are actually fantastic in the salad! Who knew?


The slaw has a nice flavor and makes a lovely presentation. I would recommend only using the amount of dressing you need. I wouldn’t pour the entire amount in the bowl. I think that would be over the top. Also do not add the Ramen, Sunflower seeds, or the almonds until you are just about to serve the slaw.

Easy and delicious! That’s perfect in my book!


Ingredients:

  • 2 (3 ounce) packages chicken flavor Ramen noodles
  • 16 ounce package bagged coleslaw mix
  • 1 cup toasted slivered almonds
  • 1 cup sunflower seed toasted
  • ½ bunch green onion, sliced
  • ¼ cup brown sugar
  • 1 tbsp. sesame oil
  • ¼ cup vegetable oil (don’t use olive oil because it will change the flavor)
  • cup rice wine vinegar
Directions:
  1. In a small bowl add brown sugar, sesame oil, vegetable oil, the two packets of ramen seasoning mix and rice wine vinegar whisk all together until the sugar melts, then set aside.
  2. Before opening the ramen noodles, crush into 1 inch pieces and set aside.
  3. In a separate large bowl add slaw, along with the dressing. I recommend adding just enough dressing to cover the salad well. I found that the recipe makes a bit too much dressing and I didn’t want my slaw dripping with dressing. You can always add more before serving. Cover and chill two hours. Reserve extra dressing.
  4. Once your slaw has chilled mix it well and decide if you need to add more dressing or not.
  5. About 10 minute before serving add ramen, almonds, and sunflower seeds and mix well. Again check to see if you need more dressing and serve.
  6. You will want to add your crunchy items just before serving or they will get mushy!

Original Recipe Source

var pfHeaderImgUrl = ”;var pfHeaderTagline = ”;var pfdisableClickToDel = 0;var pfHideImages = 0;var pfDisablePDF = 0;var pfDisableEmail = 0;var pfDisablePrint = 0;var pfCustomCSS = ”;var pfBtVersion=’1′;(function(){var js, pf;pf = document.createElement(‘script’);pf.type = ‘text/javascript’;if(‘https:’ == document.location.protocol){js=’https://pf-cdn.printfriendly.com/ssl/main.js’}else{js=’http://cdn.printfriendly.com/printfriendly.js’}pf.src=js;document.getElementsByTagName(‘head’)[0].appendChild(pf)})();Print Friendly and PDF
Check Out Our Online Recipe Book: www.CafeChatterbox.com

Recipes

Cheater Korean Beef


This recipe is fantastic I mean really fantastic! I had it ready in just minutes! While the ground beef was browning I was mixing up the sauce and while the entire thing was cooking together I was heating up the rice. I made the brown rice the day before to save on time meaning dinner came together fast! I combine this dish with a large bowl of Asian Ramen for a wonderful and filling dinner.


There are so many things to love about this recipe but the speed and cost are high on my list of reasons to love it.  The flavor is wonderful too! Simply wonderful!


The only thing negative I can say about this recipe is that it just doesn’t go far enough. For our family it fell a little short I might made another half recipe next time. Also, I might even use cabbage in place of rice to lower the calories. Now that sounds delicious! 


Ingredients:

  • 1/4 cup brown sugar
  • 1/2 cup soy sauce
  • 1-1/2 tablespoon sesame oil
  • ¼+ teaspoon crushed red-pepper flakes, or more to taste
  • 1/2 teaspoon ground ginger
  • 1-1/2 tablespoon vegetable oil
  • 4 small cloves garlic, minced
  • 1 pound ground beef (90/10 or better)
  • 4 green onions, thinly sliced
  • Cooked rice, for serving

Directions:

  1. In a small bowl, whisk together brown sugar, soy sauce, sesame oil, red pepper flakes and ginger.
  2. Heat vegetable oil in a large skillet over medium high heat. 
  3. Add garlic and cook, stirring constantly, until fragrant, about 1 minute. 
  4. Add ground beef and cook until browned, about 3-5 minutes, making sure to crumble the beef as it cooks; drain excess fat. 
  5. Stir in soy sauce mixture and green onions until well combined, allowing to simmer until heated through, about 2 minutes.

Original Recipe Source

var pfHeaderImgUrl = ”;var pfHeaderTagline = ”;var pfdisableClickToDel = 0;var pfHideImages = 0;var pfDisablePDF = 0;var pfDisableEmail = 0;var pfDisablePrint = 0;var pfCustomCSS = ”;var pfBtVersion=’1′;(function(){var js, pf;pf = document.createElement(‘script’);pf.type = ‘text/javascript’;if(‘https:’ == document.location.protocol){js=’https://pf-cdn.printfriendly.com/ssl/main.js’}else{js=’http://cdn.printfriendly.com/printfriendly.js’}pf.src=js;document.getElementsByTagName(‘head’)[0].appendChild(pf)})();Print Friendly and PDF
Check Out Our Online Recipe Book: www.CafeChatterbox.com

Recipes

To Eat the Egg or to NOT Eat the Egg… That is the Question!


If you are like us egg are either feast or famine in your house. We either go through them like water or they expire. Well lately it’s been expiration city. I found eggs for a sweet price at one store and I forgot I had already bought some at another store so then during the “no one’s eating eggs” season I had two dozen eggs that were expired.

I don’t know about you but I hate the idea of wasting food even eggs, and I hate eggs. But a chicken worked really hard to make the egg that are now expired and the money we spent is now wasted too! No one wins!

All of these Eggs were bad! Bummer!

The good news is even if the carton indicated that your eggs are expired they still might be good and maybe good for longer than you think!


Here is a good way to check if your eggs are expired or not.
  1. Fill up a large mixing bowl full of cool water and place a few eggs at a time in the bowl of water. Don’t overcrowd the bowl just a few will do. 
  2. If the eggs rise to the top of the bowl then they need to be thrown away. If the eggs sink they are still good. 
  3. Don’t judge the carton by one egg try them all out because you may have a few that are still good.
Bad Eggs! Bummer!

So how do you know the egg is bad because it rises to the top of the water? The reason the egg rises to the top of the water is because the white of the egg has started to evaporate which is leaving the egg hollow. The lighter the egg the quicker it rises to the top of the water. If the egg rises it needs to be thrown away. If it sinks you still have time, but I wouldn’t wait too long. 


Good Eggs!

Boil the older eggs or even fry them up if you are in a pinch.  Better yet have breakfast for dinner to use up those eggs. It’s an inexpensive meal and it’s a great way to get rid of eggs without them going to waste.

If you are still a little nervous about the egg let your nose be the judge! It probably won’t fail you, but I have found the bowl of water trick to work every time!

var pfHeaderImgUrl = ”;var pfHeaderTagline = ”;var pfdisableClickToDel = 0;var pfHideImages = 0;var pfDisablePDF = 0;var pfDisableEmail = 0;var pfDisablePrint = 0;var pfCustomCSS = ”;var pfBtVersion=’1′;(function(){var js, pf;pf = document.createElement(‘script’);pf.type = ‘text/javascript’;if(‘https:’ == document.location.protocol){js=’https://pf-cdn.printfriendly.com/ssl/main.js’}else{js=’http://cdn.printfriendly.com/printfriendly.js’}pf.src=js;document.getElementsByTagName(‘head’)[0].appendChild(pf)})();Print Friendly and PDF
Check Out Our Online Recipe Book: www.CafeChatterbox.com