Recipes

Chunky Refried Beans

When I was a kid I hated beans I mean HATED them! There was nothing you could do to convince me to eat them. Now I love them. I can eat them right out of a can if I am given a chance. I probably have a protein deficiency or something.

I normally don’t buy canned beans. I prefer to buy them in a bag and make them myself. I like to do this for so many reasons for instance: I am trying to avoid BPA’s in canned good,  it’s a lot less expensive to make them yourself (3 to 1), and because I get to choose what goes in them. Normally I toss a bag of beans in water, let them set all night, then toss them in the crock pot and let them cook for the day. After that I bag them and freeze them. We always have beans in the freezer. I can buy a bag for $1 and it will make 3 cans worth of beans! Not bad for .33/can.

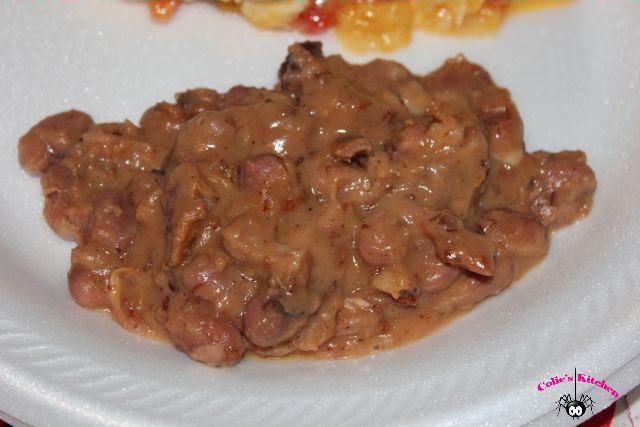
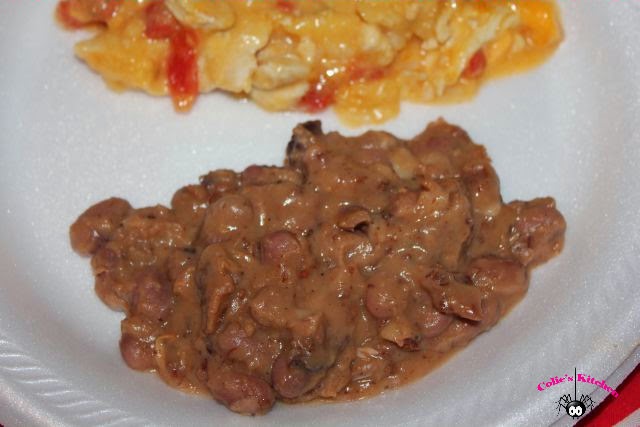
This is a quick and easy way to make refried beans and better yet they are inexpensive and full of flavor and a lot of protein.  I love the chunky beans in it too. They add a nice texture and fill you up! You can’t beat quick and easy but the icing on the cake is the great flavor!


Ingredients:

  • ½ can refried beans
  • 1 can pinto beans (drain and wash)
  • ½ cup water
  • 2 tbsp. butter
  • 2 tbsp. bacon bits
  • 1 tsp. ground chicken bouillon granules

Directions:

  1. In a skillet add butter and allow to melt
  2. To the melted butter add bacon bits and allow to heat up until the bacon begins to pop
  3. Next add refried beans and water. Mix together well
  4. Add bouillon
  5. Once the beans begin to bubble add your drained and washed pinto beans
  6. Gently fold in the pinto bean
  7. Cook until most of the liquid has evaporated or until you have a consistency you like
  8. Add salt as needed but try the beans before you add salt because of the bouillon and the bacon

Print Friendly and PDF
Check Out Our Online Recipe Book: www.CafeChatterbox.com

Recipes

Chicken Tortilla Bake

I was in a jam a few weeks ago. I had no idea what to make for dinner. I knew I didn’t have any desire to leave my warm house and head out for dinner nor did I want fast fun! That sounded terrible. I decided that I would make this quick and easy recipe because I had everything on hand!

It turned out great! I threw it together and stuck it in the oven in a matter or no time. If you don’t have chicken ready to cook you can always use canned chicken. If you are like me you always have chicken in the freezer cut into chunks waiting to be cooked, and I always have corn tortillas in the freezer too. I buy the pick pack then freeze the rest. They never go to waste that way.

Rotel, cheese, and cream of whatever soup is always ready in our house too. Once again pantry staples. This recipe is great! It’s also something you can make ahead of time maybe on Sunday to free up time during the work week, it also makes a great freezer meal. I think you could change it up a bit too, you can change the heat by changing the Rotel from mild to hot, chicken to beef, or even adding in some veggies like corn to the mix.
This recipe is really great, quick and easy! I think adding a bit of heat to it is key for great flavor!


Ingredients:
  • 2-10 3/4oz cans of cream of chicken
  • ¼ tsp. garlic powder
  • ¼ tsp. cumin
  • ¼ tsp. chili powder
  • 3- tbsp. butter
  • 1 tbsp. dry onion flakes (you could use fresh onion)
  • 1 tbsp. vegetable oil
  • 10oz can of dice tomatoes and green chilies
  • 12-6in corn tortillas
  • 3 cups of raw diced chicken
  • 2 cups shredded Mexican cheese blend

Directions:

  1. Preheat oven to 350 degrees
  2. In a frying pan add butter and oil and heat until butter is melted.  Next add chicken to the oil and coat chicken well
  3. Next to the pan add chili powder, cumin, garlic powder, dried onion flakes
  4. Pan fry chicken until it’s cooked through then turn off burner
  5. Once the chicken is cooked if necessary cut into smaller bite sizes pieces
  6. To the pan of chicken (do not remove drippings from the pan) add canned soup and tomatoes and mix them up all together, then set aside.
  7. Chop up the tortillas into bite sized pieces.
  8. To a 9X13 pan add a small amount of the chicken and soup mix just enough to lightly coat the bottom of the pan maybe ¼ cup.
  9. Add 1/3 of the tortillas
  10. Add ½ chicken/soup mix
  11. Light layer of cheese
  12. 1/3 of the tortillas
  13. Second ½ of soup mix
  14. Light layer cheese
  15. Last 1/3 of the tortillas
  16. Generous layer of remaining cheese
  17. Cover and bake for 40 minutes
  18. If it’s too runny allow to set for 5 minutes to thicken

Print Friendly and PDF
Check Out Our Online Recipe Book: www.CafeChatterbox.com

Recipes

Fantastico Vodka Pasta Sauce


I am in love with this recipe oh my it’s soooo good!! Although I made it a tad differently than the original recipe, it turned out so good that I don’t think I would change a thing that I did. Basically the only changes I made were using jarred spaghetti sauce instead of tomato sauce and I used milk instead of heavy cream because it’s what I had on hand.

I used the spaghetti sauce because I had part of a jar in the frig that needed to be used and I thought why not? The great thing about the jarred sauce is that it had spices in it that the original recipe didn’t have. I am not a huge fan of jarred sauce because it seems to mostly be lacking flavor but with a little work this terrible jar of sauce turned into a wonderful masterpiece.  It’s a great way to use up some extra sauce and boy does it make a great presentation.

Because of the pictures in the original recipe I used lasagna noodles cut into strips for my pasta but to be honest with you I will never do that again. The pasta sauce is nice and light and to me requires a pasta that is the same way. Although the lasagna noodles were cut into strips they were still too thick and cumbersome. Not good at all!

This sauce recipe is fantastic! The entire family loved it. It was quick and easy and super inexpensive. I had everything I needed on hand so I had nothing to lose by trying it. This recipe is also a great meatless meal!

For those concerned with the vodka not to worry because the alcohol burns off and all you are left with is flavor. Don’t leave the vodka out or you are defeating the purpose of the entire recipe. You will not taste any alcohol flavor at all.

I am so thankful we have leftover for lunch!! This will be a regular items on our menu especially when I can get cheap jarred pasta sauce on sale.


Ingredients:

  • 1 pound Pasta
  • 2 Tablespoons Olive Oil
  • 2 Tablespoons Butter
  • 1 whole Medium Onion, Chopped Finely
  • 2 cloves (to 3 Cloves) Garlic, Chopped
  • 1 cup Vodka
  • 14 oz. Jarred Spaghetti Sauce or 1 large can of Tomato Puree
  • 1 cup Heavy Cream or milk
  • 1 pinch Red Pepper Flakes
  • 1/4 teaspoon (to 1/2 Teaspoon) Salt
  •  Freshly Ground Black Pepper, To Taste
  • 1 cup Grated Parmesan Cheese

Directions:

  1. Cook pasta according to package directions, being careful not to overcook.
  2. In a large skillet over medium heat, add olive oil and butter. When butter is melted, add in chopped onion and garlic. Stir and allow to cook for two minutes. Pour in vodka. Stir and cook for three minutes. Add in tomato puree and stir.
  3. Reduce heat to low and stir in cream. Allow to simmer, being careful not to overheat. Stir in red pepper flakes, salt and pepper.
  4. Drain the pasta, reserving 1 cup of pasta water in case sauce is too thick. Add cooked pasta to the sauce, tossing to combine. Splash in a little water if it needs it. Stir in Parmesan cheese.
  5. Pour mixture into large serving bowl. Garnish with more Parmesan cheese.

Print Friendly and PDF
Check Out Our Online Recipe Book: www.CafeChatterbox.com

Recipes

Mayonnaise Chicken Tenders

I love homemade chicken tenders. You won’t catch me buying any premade. I just don’t like the flavor. Making them yourself is so easy! It just takes a few steps and if time is an issue a little prep work ahead of time and you will be ready to roll. Your family will appreciate something homemade with flavor versus something frozen and rubbery.

I love making these tenders with mayo. The mayo takes the chicken to a new level because it makes the breading light and crispy and even adds a nice extra flavor.
I always use Dukes light Mayonnaise but that is my personal choice. I love the lemony flavor and of course I don’t mind saving a few calories either, but it’s up to you.


Ingredients:

  • 1 lbs. of boneless chicken breast cut into tenders
  • ½ mayonnaise
  • 3tbs + milk
  • 1/3 container of Italian bread crumbs
  • Vegetable oil
Directions:

  1. In a bowl mix the mayonnaise with one tablespoon of milk at a time. You are looking for a creamy drippy paste consistency. I don’t want to tell you exactly how much milk to add because it will depend on the consistency of the mayonnaise you use. If you add too much milk you can add more mayo and vice versa. I do suggest adding the milk one tablespoon at a time or it could turn into a very bad never ending circle. 😉
  2. Once your paste in ready set it aside for a moment. You will need an additional bowl or plate for your tenders and one for your bread crumbs. An assembly line process works really well for making tenders. If you have kids that like to help in the kitchen now is the time to recruit them!
  3. Place each tenders one at a time into the mayo milk mixture then dredge it through the bread crumbs. I like to use a fork and smash the chicken into the bread crumbs a bit to insure the chicken is well coated. 
  4. Once you chicken is well coated on both sides set it aside on a plate or on a pan. Repeat until all your tenders are covered.
  5. Now your chicken tenders are ready to fry.
  6. Heat your vegetable oil on medium high, but watch your oil so it doesn’t get too hot.
  7. Throughout your frying process you may need to turn it down a bit, so that the oil doesn’t get too hot, and also because you may have bread crumbs at the bottom of your pan and you don’t want them to burn either.
  8. As you are frying up your tenders slide them into a pre-heated 200 degree oven. This will keep your tenders warm, but won’t dry them out.
  9. Fry in small batches and keep an eye on your tenders because they do cook fast and you don’t want to over cook them because they will be tough and dry.
  10. Serve warm

Print Friendly and PDF
Check Out Our Online Recipe Book: www.CafeChatterbox.com

Recipes

"Like" Progresso Italian Style Bread Crumbs


I found myself in a real mess yesterday when I needed Italian bread crumbs but I realized I didn’t have any. I decided I better get to work looking for a copycat recipe considering all the grocery stores were closed.


It didn’t take long before I came across the perfect recipe that is a copycat recipe of Progresso’s Italian bread crumbs which is my favorite.

It was super easy to put together and let me tell you it (in my opinion) is right on the money, and taste just like the real deal. I have plain breadcrumbs that were premade so I used those because of time but it would be super easy to use old pieces of bread to make them homemade from start to finish.

Ingredients:

  • 1 cup plain bread crumbs
  • 1 T. dried, grated Parmesan cheese
  • 1/2 tsp. salt (you can decrease or omit this, since Progresso’s salt content is high)
  • 1/2 tsp. parsley flakes
  • 1/4 tsp. garlic powder
  • 1/4 tsp. onion powder
  • 1/4 tsp. sugar
  • Dash of oregano

Directions:

  1. Measure out all the ingredients into a mixing bowl. Stir and mix until all the ingredients are completely blended into a consistent mixture.
  2. The bread crumb mixture is ready to be used at this point, just as you would use store-bought crumbs. Or, transfer the batch to an airtight container and store in a cool, dry place until you need to use it.
  3. Makes 1 cup

var pfHeaderImgUrl = ”;var pfHeaderTagline = ”;var pfdisableClickToDel = 0;var pfHideImages = 0;var pfDisablePDF = 0;var pfDisableEmail = 0;var pfDisablePrint = 0;var pfCustomCSS = ”;var pfBtVersion=’1′;(function(){var js, pf;pf = document.createElement(‘script’);pf.type = ‘text/javascript’;if(‘https:’ == document.location.protocol){js=’https://pf-cdn.printfriendly.com/ssl/main.js’}else{js=’http://cdn.printfriendly.com/printfriendly.js’}pf.src=js;document.getElementsByTagName(‘head’)[0].appendChild(pf)})();Print Friendly and PDF
Check Out Our Online Recipe Book: www.CafeChatterbox.com