Recipes

Garlic and Parmesan Panko Baked Fried Chicken

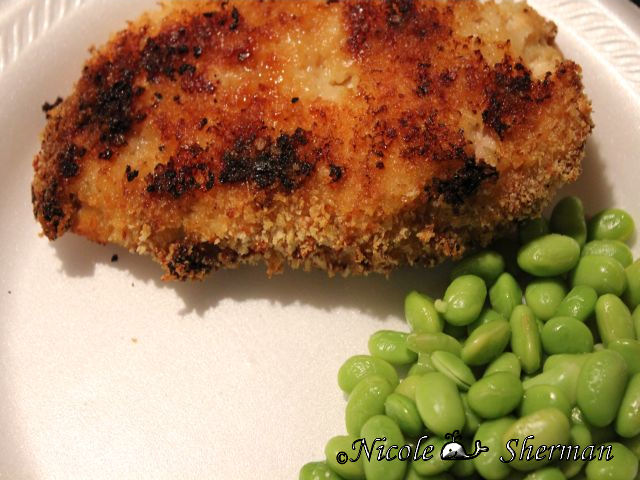
I was in the mood for fried chicken, but in all honestly I was being too lazy to be bothered with frying it so I decided to make dinner easy and go for oven “fried” chicken.

Most recipes I found online required you to use plain bread crumbs, but I only had Italian bread crumbs, and I wasn’t in the mood for those spices.  I decided to use up some panko I had on hand and a few other ingredients and see how it turned out.

To my surprise this speedy recipe turned out fantastic! The chicken had a wonderful flavor, it was crispy, and very moist inside. I typically don’t have a lot of faith in baked chicken because it’s just not as good as fried chicken, but this recipe really turned out excellent! 

Ingredients:
  • 3-4 boneless/skinless chicken breasts
  • 1 cup of plain panko
  • ½ cup parmesan cheese
  • 1 tbsp. garlic powder
  • Salt and pepper to taste
  • 2 eggs
  • Cooking spray

Directions:
  1. Pre-heat oven to 350 degrees
  2. Spray a baking dish or jelly roll pan down with Pam or some other type of cooking spray. For easy clean up line your pan or baking dish with foil, then spray the foil with cooking spray.
  3. In a shallow dish add panko, parmesan cheese, garlic powder, salt and pepper, and mix together.
  4. In a separate bowl add eggs and scramble up with a fork until the eggs are frothy.
  5. One at a time take each chicken breast and add it to the egg dip, then add each chicken breast to the panko dish and evenly coat the chicken breast with the panko spice mixture.
  6. Place the chicken on the sprayed pan, then bake for 30 minutes or until the chicken is cooked in the center.
  7. It’s that’s simple!

 Check Out Our Online Recipe Book: www.CafeChatterbox.com

Recipes

Paulie’s Cottage Pie


After listening to my husband’s friend Paul talk about his wonderful cottage pie recipe I had to give it a try. I listened closely to what he was saying and wrote the recipe down as soon as I got home. I hope I didn’t forget anything, but I can’t imagine that I did. 

This recipe turned out perfect! I don’t know that there would have been anything else I could have done to make any better! It’s hard to top perfection! After all Paul is English so I suppose he would know how to make a rockin’ cottage pie!

This recipe is terribly easy!  You could certainly make this in advance as a freezer meal, or even make the meat and mashed potatoes up ahead of time and have everything ready to throw together as a quick and easy meal.

We all loved this recipe! It definitely takes comfort food to a whole new level!!
Ingredients:
  • 1 Bell Pepper diced
  • 1 Onion diced
  • 1lb. Ground Beef
  • 3 Cloves of Garlic
  • Salt and Pepper to tastes
  • 1 Can Campbell’s Chunky Vegetable Soup (Hearty Soup not the condensed)
  • 1 tbsp. Montreal Steak Seasoning
  • 1 pound of potatoes peeled, diced, boiled, and mashed
  • 1 cup cheddar cheese.

Directions:
  1. Bring a pot of cold water to a boil.
  2. To the boiling water add peeled and diced potatoes boil until the potatoes are fully cooked, drain, and mash.
  3. Add salt, pepper, and sour cream if desired to the mashed potatoes. (I did to make the potatoes creamy)
  4. In a skillet add ground beef, bell pepper, onion, and garlic, cook until meat is browned then drain off excess grease.
  5. To the ground beef add Montreal Steak Seasoning, salt and pepper, and mix together well.
  6. To a baking dish ( I used 2 ½ quart baking dish)  add the ground beef mixture, top the ground beef mixture with Campbell’s chunky Vegetable Soup be sure to spread out evenly
  7. Over the vegetable soup add mashed potatoes, and spread out evenly.
  8. Top the cottage pie with shredded cheddar cheese.
  9. Bake on 350 for 20-30 minutes until the cottage pie is bubbling.
  10. Allow to set for about 5 minutes before serving.

Check Out Our Online Recipe Book: www.CafeChatterbox.com

Recipes

Colie’s Cheesy Chicken Enchilada Casserole


Admittedly I am horrible at following a recipe. Why? Because I can always think of a way to do it “better” or I need to use up something in the refrigerator, or I am missing something I need.  For once none of these were the case. I liked the concept of the recipe I found online, but it wasn’t what I was going for. I had pre-cooked chicken that I roasted in the crockpot for chicken enchiladas that I wanted to use, but this recipe called for the chicken to start uncooked.  I didn’t want to be bothered!


This was super simple and quite tasty! I was a little nervous about how it would turn out, but it turned out so yummy, and we had a ton left over! Literally we ate 1/3 of the casserole for dinner as a side I served Sweet Corn Cakes.


I loved the ease of the recipe, and loved the flavor! Just remember for those people who are nervous in the kitchen if you never stray away from a recipe you will never know what you can create! The best recipes are created by accident. Brownies were created  from a failed cake recipe.


Ingredients:
  • 2 tablespoons margarine
  • 1 pound of cooked skinless boneless chicken breast shredded
  • Salt and pepper to taste
  • 1 teaspoons cumin powder
  • 1 teaspoons garlic powder
  • 1/2 teaspoon taco seasoning
  • 1/2 onion, chopped
  • cloves garlic, minced
  • 1/2 cup canned corn (drained)
  • 1 small can of diced green chilies
  • 1 14oz can of diced tomatoes (undrained)
  • 16 corn tortillas
  • 2 cans of Old El Paso enchilada sauce (I used Mild)
  • 2 cups shredded Kraft Mexican Cheese
  • 1 cup mozzarella Cheese
  • 1 cup cheddar cheese

 Directions:
  1. To a skillet add margarine, and onion. Sauté until onions are translucent, then add the garlic (do not allow the garlic to brown or it will taste bitter) and cook for another minute.
  2. To the skillet add salt, pepper, cumin, garlic powder, and taco seasoning and mix well.
  3. Next add corn, green chilies, diced tomatoes, and shredded chicken all the mixture and heat thoroughly.
  4. Now to prepare your casserole! Combine all your cheese into a bowl and mix together well.
  5. Pour the enchilada sauce in a bowl, then spoon enough sauce into a 9×13 baking dish to cover the bottom.
  6. Take a corn tortilla and divide it into 4’s (you can do multiple at a time). Take each one of the fours and dip them into the enchilada sauce coating each piece front and back, then line the bottom of the pan with the tortillas, keep tearing and dipping until the entire bottom of the pan is lined with tortilla pieces.
  7. Now over the tortilla pieces spread out enough of your chicken mixture to cover the tortillas, then cover the chicken mixture with cheese (be generous).   
  8. Keep repeating this process until you are out of the chicken mixture. I was able to get four layers, but it will depend on how much of the chicken mixture you add to each layer.
  9. Your final layer should be dipped tortilla pieces covering the top of your casserole. Last top your tortilla pieces with the remaining cheese.
  10. Bake on 350 for 30 minutes or until it’s bubbling from the bottom up.

*Note you can  easily spice this recipe up by using hot or mild Rotel tomatoes in place of the diced tomatoes, you can also change the degree of heat in the enchilada sauce, mild, medium, or hot!*
Check Out Our Online Recipe Book: www.CafeChatterbox.com
Recipes

Sawmill Gravy Cream Gravy


As a lot of you know I have been a huge fan of Kittencals for a long time. She has some wonderful recipes that are almost always a must have in our home. It’s rare that we find something we don’t like. If we do it’s probably because someone is being over picky that night, or just doesn’t like what we are having for dinner in general. This recipe is another fantastic winner for Kittencal!
This gravy is my new favorite! It’s creamy and bursting with flavor! I couldn’t have found anything better in gravy!!  The first time I made it I didn’t have any bacon drippings so I used two tablespoons of butter instead and it was fantastic. If you want a totally great twist add bacon or sausage drippings … to die for!

Ingredients:
  • 2 tablespoons bacon pan drippings
  • 1/4 cup flour
  • ¼ to ½ teaspoon black pepper (start with ½ and see if you want more)
  • Salt (optional)
  • 1 pinch garlic powder
  • 1 1/2 cups chicken or beef broth
  • 1/2 cup Milk or half-and-half

Directions:

  1. Heat the pan drippings over medium heat.
  2. Whisk in flour and cook until lightly golden brown (about 3-4 minutes, the flour must be light brown!).
  3. Add in black pepper and garlic powder; then add in the broth and whisk until smooth; bring to a simmer, then slowly whisk in the cream.
  4. Cook until slightly thickened (about 4-5 minutes).
  5. Season with more black pepper and salt if desired.


Check Out Our Online Recipe Book: www.CafeChatterbox.com

Recipes

Roasting Pumpkin Seeds


One of my favorite things about carving a pumpkin is roasting the seeds. I love pumpkin seeds. They are nutritious and delicious. I love the nutty flavor! Heck you already paid for the fun of the pumpkin why not get free snacks out of the deal?

  1. I normally start the seed drying process by first washing the seeds well in cool water. Get all of the pumpkin membrane off your seeds. 
  2. It’s important that the seeds are thoroughly dry before you cook then. The dryer they are the crispier they will be.
  3. Line a jellyroll pan with paper towels, and then I spray the paper towels down with Pam or some other kind of spray oil. This will insure they will not stick to the paper towel.  After a few days of allowing them to dry it’s time to bake them. Please note that the drying process will vary based on your climate. It took ours two days. 
  4. After they are dry line a jelly roll pan with tin foil for easy clean up.
  5. Place the pumpkin seeds on the foil. Add one teaspoon of oil (pecan, or vegetable) to the pan. I don’t really recommend olive oil because it will flavor the seeds, but if that’s what you like go for it.
  6. Next you will need to toss the seeds in the oil, and then spread them out. The more evenly spread out they are the better they will crisp up.
  7. Next you can sprinkle salt on them, spices, or anything else that makes you happy. I prefer just salt, but I know other people who will add garlic powder, curry, or even a little cinnamon sugar.
  8. Heat your oven to 325 degrees. The low temperature will insure that they are roasted slowly. You will cook them for around 20 minutes, but it’s important to check them about every five minutes, and stir them each time you check them for an even roasting.
  9. As they are cooking you will start heading popping sounds those are your seeds springing up from the pan, but no worries they don’t jump too high.
  10. Don’t forget to check your seeds about every five minutes to insure they don’t burn. The thickness of the seeds will determine how quickly they will cook, and you don’t want burnt seeds.
  11. Let the holiday season begin!!

Check Out Our Online Recipe Book: www.CafeChatterbox.com