Recipes

Fruity Cottage Cheese Cups


I love fruit on the bottom cottage cheese. I think it’s fantastic but what I am not a huge fan of, besides the fact that it’s overpriced, but the fruit choices are very limited.

I starting thinking how silly it was to buy these little cups when I could just as easily make them myself. It’s fast simple and there is nothing added that you were not counting on like extra sugar or salt. I have become more aware of how much salt can be in a lot of processed food and it’s not pretty.

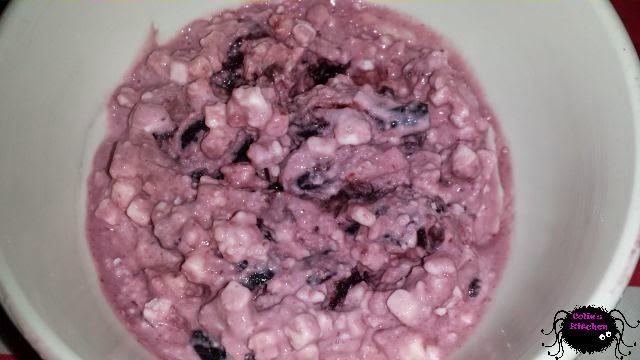
Here is a super simple recipe to make your own fruit filled cottage cheese cups.

Ingredients:
  • ½ low fat cottage cheese 2% milk
  • ½ black cherries (any fruit)
  • ½ packet stevia (or more)

Directions:

  1. Place all ingredients in a bowl
  2. Smash your cherries down a bit to make sure that they release some of their juices. 
  3. Mix well and refrigerator for a half hour or eat right away. I have found that letting it sit for about will help the flavors meld and will help thicken the cottage cheese back up.

Weight Watchers PointsPlus 2 Points

    *anything with a zero is not necessarily a zero we do not have all of those numbers available to us.

    var pfHeaderImgUrl = ”;var pfHeaderTagline = ”;var pfdisableClickToDel = 0;var pfHideImages = 0;var pfDisablePDF = 0;var pfDisableEmail = 0;var pfDisablePrint = 0;var pfCustomCSS = ”;var pfBtVersion=’1′;(function(){var js, pf;pf = document.createElement(‘script’);pf.type = ‘text/javascript’;if(‘https:’ == document.location.protocol){js=’https://pf-cdn.printfriendly.com/ssl/main.js’}else{js=’http://cdn.printfriendly.com/printfriendly.js’}pf.src=js;document.getElementsByTagName(‘head’)[0].appendChild(pf)})();Print Friendly and PDF
    Check Out Our Online Recipe Book: www.CafeChatterbox.com

    Recipes

    Individual Frozen Chocolate Peanut Butter Pies

    I have to tell you that this recipe is amazing especially if you are trying to watch your calorie intake! It’s just amazing!! It’s super sweet! I haven’t had anything this sweet in a long time so it was a total shock to my system. Although these little pies are just that “little” they come with a big punch and you certainly get a nice treat for you calorie buck so to speak.

    This can easily be made into one big pan for a large pie but I want this to be more precise with the calories so that I wasn’t being charged even an extra calorie for something I wasn’t eating or even worse not being charged for that calorie but eating it anyway. I know it’s petty but when you are watching your calories you know they add up.

    I will caution you that if you are making these you will want to weigh everything and divide it by 9 to make sure everything comes out exactly the same. I did this for all 9 pies. I know it’s anal but for me it was worth the extra steps.

    I will caution you though, this is a messy finger licking job but oh wow will your fingers taste amazing!!

    Ingredients:
    • 1 small box Sugar Free Chocolate Pudding Dry  
    • 8 ounces Fat Free Cool Whip
    • 2 Reese’s Peanut Butter (big cups)
    • 4-1/2 Sheets Chocolate Graham Crackers
    • 3 tbsp. PB2 + 2 tbsp. water
    • 3 tbsp. Chocolate Syrup
    Directions:
    1. Break each sheet of graham crackers into two pieces each pieces should consist of two crackers. You should end up with 9 pieces total, then set aside
    2. To the container of thawed fat free cool whip add dry chocolate pudding and mix well until smooth then set aside. You might add a little of the pudding at a time to make sure you get it all in there without making a mess.
    3. In a small bowl mix dry PB2 with 2 tbsp. of water, mix until smooth, then set aside. If the PB2 isn’t thin enough to drizzle add a little more water
    4. Take the two peanut butter cups and coarsely chop them into small pieces then set aside
    5. To each graham cracker spread on 1/9 of chocolate cool whip approximately 25 grams of cool whip. Pack it on nicely and evenly. 
    6. Once all 9 graham crackers have chocolate cool whip on them sprinkle each graham cracker evenly with peanut butter cup pieces. With a fork or a spoon lightly press the peanut butter cup pieces into the chocolate cool whip just enough so that the peanut butter cup pieces stay in place.
    7. Next take 1 teaspoon of the liquid PB2 and drizzle it over each cool whip filled graham cracker then do the same thing with the chocolate syrup only using 1 teaspoon of chocolate per graham cracker. Then freeze for at least 2 hours.
    *anything with a zero is not necessarily a zero we do not have those numbers available to us.

    var pfHeaderImgUrl = ”;var pfHeaderTagline = ”;var pfdisableClickToDel = 0;var pfHideImages = 0;var pfDisablePDF = 0;var pfDisableEmail = 0;var pfDisablePrint = 0;var pfCustomCSS = ”;var pfBtVersion=’1′;(function(){var js, pf;pf = document.createElement(‘script’);pf.type = ‘text/javascript’;if(‘https:’ == document.location.protocol){js=’https://pf-cdn.printfriendly.com/ssl/main.js’}else{js=’http://cdn.printfriendly.com/printfriendly.js’}pf.src=js;document.getElementsByTagName(‘head’)[0].appendChild(pf)})();Print Friendly and PDF
    Check Out Our Online Recipe Book: www.CafeChatterbox.com

    Recipes

    Mexican Style Pinto Beans


    This recipe is amazing. We have been eating on it off and on for days. It’s quickly become a favorite recipe. This recipe is super easy, filling, and delicious! I never thought I could love beans as a main dish but this is one that I could eat until I was sick. The flavor is just incredible!

    I love how easy it is. The biggest pain about this recipe is just remembering to soak your beans long enough and really that’s it. I love recipes that are easy and delicious. This certainly fits the bill.
    Ingredients:
    • 1 pound dried pinto beans, rinsed
    • 1 (10 ounce) cans diced tomatoes with green chile peppers
    • 1 (16 ounce) can diced tomatoes
    • 1/2 pound bacon, cut into 1/2-inch pieces
    • 1 onion, chopped
    • 1 tablespoon chili powder, or to taste
    • 1 tablespoon ground cumin, or to taste
    • 1-1/2 teaspoons garlic powder, or to taste
    • 3 cloves minced garlic
    • 4-6 cups chicken broth
    • Salt to taste
    • 4 tablespoons baking soda

    Directions:

    1. **36 hours before making your beans it’s important that you wash the dry beans then place them in a bowl with just enough water to cover them. Mix in two tablespoons of baking soda then let them sit for 24 hours. After 24 hours clean the water and wash the beans. Repeat with water and baking soda for another 12 hours. This soaking process will help with removing anything from the beans that will upset your stomach and the soaking will speed up the cooking process. **
    2. To a large pot add diced bacon, garlic and onion. Cook until the bacon starts getting crispy (do not drain drippings), then add drained beans and all remaining ingredients pour enough broth over the beans to cover them adding an extra two inches of broth above the beans.
    3. Bring to a boil, reduce heat to low, and simmer covered for 3 hours.
    4. Add salt to taste at this point.

    Original Recipe Source

    var pfHeaderImgUrl = ”;var pfHeaderTagline = ”;var pfdisableClickToDel = 0;var pfHideImages = 0;var pfDisablePDF = 0;var pfDisableEmail = 0;var pfDisablePrint = 0;var pfCustomCSS = ”;var pfBtVersion=’1′;(function(){var js, pf;pf = document.createElement(‘script’);pf.type = ‘text/javascript’;if(‘https:’ == document.location.protocol){js=’https://pf-cdn.printfriendly.com/ssl/main.js’}else{js=’http://cdn.printfriendly.com/printfriendly.js’}pf.src=js;document.getElementsByTagName(‘head’)[0].appendChild(pf)})();Print Friendly and PDF
    Check Out Our Online Recipe Book: www.CafeChatterbox.com

    Recipes

    Roasted Double Garlic Hummus (2 WW Points+)

    I love hummus so it’s hard pressed for me to find one that I don’t like but I must admit this take the top for me. I love the roasted garlic! Boy do I love it. Although I only put two pods of garlic in this hummus which made it awesome I think next time I will add even more. Because the garlic is roasted the flavor is mild and sweet.
    This recipe is 2 Points if you are following Weight Watchers and if you are not that means you are lucky and can have as much as you like!!

    Ingredients:
    • 2 cups canned chick-peas
    • 2 tablespoons tahini
    • 2 tablespoons olive oil
    • 1/4 cup warm water
    • 2 large head of garlic
    • 1 lemon, juice of
    • 1/4 teaspoon sea salt

    Directions:

    1. Preheat oven to 375°F Cut off the very top of the garlic clove so that the tops of most of the cloves are exposed slightly. Coat with a little olive oil and wrap securely in tin foil. Roast garlic in oven for 1 hour. Remove and allow to cool.
    2. Squeeze the roasted garlic out of each pod and put into a food processor. 
    3. Rinse and drain chickpeas then add them, and all other ingredients, to the food processor and blend until completely smooth. 
    4. Add more water as needed until you reach your desired consistency.

    Original Recipe Source

    var pfHeaderImgUrl = ”;var pfHeaderTagline = ”;var pfdisableClickToDel = 0;var pfHideImages = 0;var pfDisablePDF = 0;var pfDisableEmail = 0;var pfDisablePrint = 0;var pfCustomCSS = ”;var pfBtVersion=’1′;(function(){var js, pf;pf = document.createElement(‘script’);pf.type = ‘text/javascript’;if(‘https:’ == document.location.protocol){js=’https://pf-cdn.printfriendly.com/ssl/main.js’}else{js=’http://cdn.printfriendly.com/printfriendly.js’}pf.src=js;document.getElementsByTagName(‘head’)[0].appendChild(pf)})();Print Friendly and PDF
    Check Out Our Online Recipe Book: www.CafeChatterbox.com

    Recipes

    Triple Berry Dump (4 WW Points+)

    This recipe is AMAZING! I mean amazing! I can’t tell you just how much everyone loved this cake. It’s absurdly ridiculous how easy it is to make and what a great outcome it has. Now don’t get me wrong it’s not a pretty cake but it makes up for it in low Weight Watchers and the flavor. Oh my goodness! This is a quick and easy cake you brag about.


    It’s also very adaptable. You can use any fruit, and any flavor of cake. I would suggest something neutral if you are using fruit but you could do a cinnamon cake with apples, or a chocolate cake with dark cherries. Just about anything is a go here!!

    Oh most importantly it’s 4 weight watchers points when you divide the cake into 12 pieces! It’s easiest to this this once the cake has cooled!

    Ingredients:
    1. 1 can diet sprite/7-up
    2. 1 box Golden Vanilla Cake Mix (Should be 160 calories per serving)
    3. ¾ cup sliced hulled strawberries –Frozen
    4. ½ cup pitted cherries –Frozen
    5. ½ cup blueberries –Frozen
    6. ½ tbsp. ground cinnamon
    7. 2 packets Truvia
    8. Butter Spray or Cooking Spray

    Ingredients:

    1. Pre-heat oven to 350 degrees
    2. To a 9×13 baking dish spray with cooking spray then add all frozen berries. Make sure to disperse them equally around the pan mixing up berries so that each slice will have a little bit of each type of berry.
    3. Next sprinkle Truvia over berries equally
    4. Cover berries with dry boxed cake mix and once again dispersing equally
    5. Once the cake mix is covering the berries pour the diet soda over the cake mix. Cover the entire cake the best you can but do not add extra soda if you can’t cover everything. *Please note that it’s OK if the soda does not cover the entire cake perfectly because it will make the cake nice and crumbly in certain spots, like a crumb cake. (This isn’t a bad thing)*
    6. Once the cake is covered in soda cover the baking dish with tin foil and bake at 350 degree for 20 minutes. After 20 minutes remove the tin foil and bake another 45 minutes to 1 hour. (Mine took 1 hour) After 45 minutes if you cake isn’t done check it every 5 minutes until it’s as your desired consistency.

    Print Friendly and PDF
    Check Out Our Online Recipe Book: www.CafeChatterbox.com