Recipes

Party Pizazz Cheesy Garlic Bread Spread

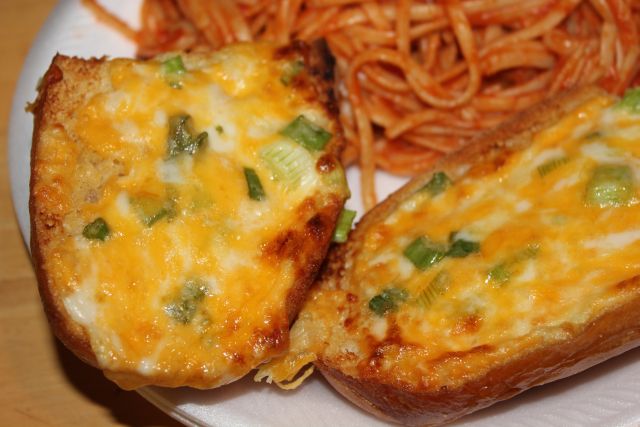
We had some friends over for dinner a few nights ago. I was serving French bread with dinner, but I didn’t really want to serve plain French bread I wanted it to be something that would stand out and something that would be noticed and be delicious.


I found this recipe while searching the web. I had everything I needed on hand and in just a matter of no time it was ready and baking in the oven. Oh it’s so delicious. It got the reaction I wanted that is for sure. My guests were in love with it and begged for the recipe. I thought that was pretty cool I had no idea I would be print my guest recipes before they left that night.

Fair warning this recipe makes A LOT! Listed below is the half recipe and it still made a ton of spread.  I am excited to have extra, but I can easily see halving this recipe again.


Ingredients:
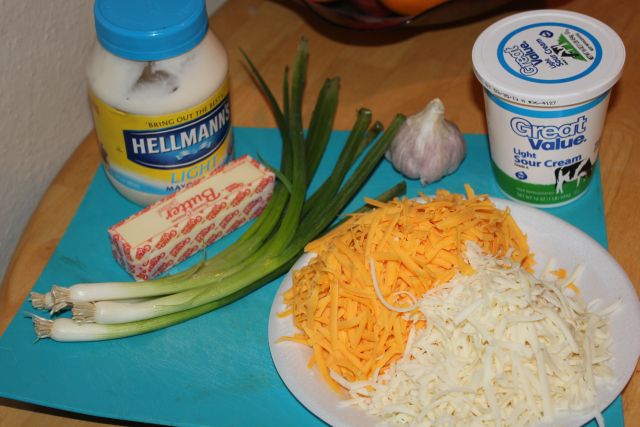
  • 4 oz. shredded Mozzarella cheese
  • 8 oz. shredded sharp cheddar cheese
  • 1/4 green onion chopped fine
  • 1/2 cup mayonnaise
  • 2 Tbsp. sour cream (optional)
  • 3 cloves garlic, minced
  • 1 stick unsalted butter, softened to the point of being slightly melted
  • 1 loaf of French bread

Directions:
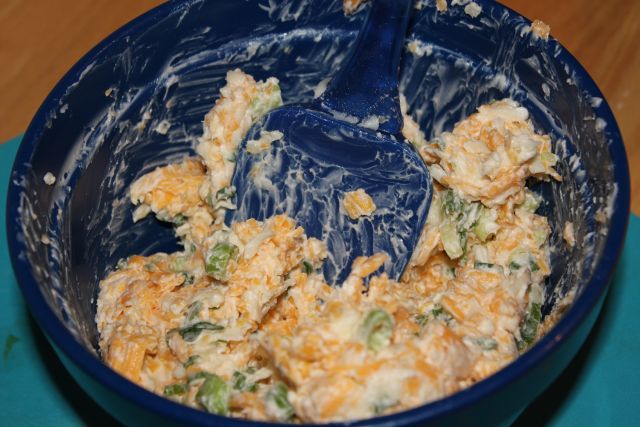
  1. In a large bowl, mix together the cheeses and the green onion. Stir in the mayonnaise and sour cream. In a separate small bowl blend the butter and garlic until smooth. Add the butter mixture to the cheese mixture.
  2. Preheat broiler. Slice loaf of bread in half horizontally, lay crust side down. Spread cheese mixture over the bread. Place under the broiler until nicely browned, about 3 to 5 minutes.
  3. Remove from broiler and let sit for 5 minutes until cool enough to handle. Slice the bread with a bread knife. Serve. 

var pfHeaderImgUrl = ”;var pfHeaderTagline = ”;var pfdisableClickToDel = 0;var pfHideImages = 0;var pfDisablePDF = 0;var pfDisableEmail = 0;var pfDisablePrint = 0;var pfCustomCSS = ”;var pfBtVersion=’1′;(function(){var js, pf;pf = document.createElement(‘script’);pf.type = ‘text/javascript’;if(‘https:’ == document.location.protocol){js=’https://pf-cdn.printfriendly.com/ssl/main.js’}else{js=’http://cdn.printfriendly.com/printfriendly.js’}pf.src=js;document.getElementsByTagName(‘head’)[0].appendChild(pf)})();
Check Out Our Online Recipe Book: www.CafeChatterbox.com

Recipes

Maple Brown Sugar Oatmeal


I love oatmeal. I love eating it for lunch more than breakfast. It’s a nice hearty meal that easily carries me through until dinner.  One of my favorite oatmeal flavors is maple brown sugar but I don’t like the kind in a box. I like it homemade. I think the boxed oatmeal is too over the top and has a fake maple flavor and I don’t like the smell either.

In an effort to remove as much pre-fab food from our diets I haven’t been buying anything much in a box lately anyway. I thought I would try to make my own maple brown sugar oatmeal and I am sure happy I did!

This recipe is delicious! It has just the right amount of oats to sweetness ratio that is full of flavor and leaves you very full. I am excited it turned out so good! With many attempts in the past I wasn’t anticipating much success but this recipe is a winner.

Serves: 3-4
Ingredients:
  • 1-1/2 cups old fashioned oats
  • 1-1/2 cups unsweetened coconut milk
  • 1/2 or 1 cup of water (Depending on how thick you like it)
  • ¼ cup brown sugar
  • 1/8 cup maple syrup
  • Pinch of salt

Directions:

  1. Add milk, brown sugar, and water to a medium sized pot and bring to a boil.  
  2. Once the liquid begins to boil add oats and salt and allow to cook until the oats soften up. 
  3. Once the oats are soft turn your burner off and add maple syrup.
  4. Allow your oatmeal to set off the burner for about 3-5 minutes or until it’s nice and thick. 


Check Out Our Online Recipe Book: www.CafeChatterbox.com

Recipes

Very Veggie Vegetarian Chili


I am not a huge fan of chili  but I decide to give vegetarian chili a chance. To say it’s different is an understatement. Different doesn’t mean bad, but when you are accustom to meat it’s an adjustment.

I loved all the veggies in it. To say this chili is healthy is an understatement. I actually made all of the beans myself without using canned ones but canned will prove to be easier. I just had these in the freezer and wanted to use them.

Homemade beans are ridiculously easy to make especially when you are talking about just making them like the ones in the cans. No spices and not much work. Soak a bag of dry beans for 12 hours, drain add to a pot of water and cook until tender. No spices or anything just like what you get in the cans. I can get the equal amount of 3 cans of beans out of 1 bag. Basically it’s 33 cents a can or less for me. I love that. I freeze them in freezer bags adding 15.oz of the beans to eat bag then topping with the extra juice then I freeze them. It’s super simple and healthier than eating them out of a can, and cheaper!!

In the end I actually liked this chili but it reminded me more of a hearty soup or stew verses a chili. Although it tastes like chili in the chili powder sense it doesn’t in the real chili sense.

If you like the flavor of chili and you love veggies this chili is for you!! This would be incredible used as the chili in a Frito Pie, and also great as chili cheese enchiladas.


Ingredients:

  • 2-28oz cans of diced tomatoes (do not discard juice)
  • 10.oz fresh mushrooms diced
  • 1 can of beans kidney beans
  • 1 can great northern beans
  • 2 cup of frozen corn
  • 3 stalks of celery diced
  • 2 bell peppers, diced
  • 3 carrots, diced
  • 1 large onion, diced
  • 4 cloves of garlic, minced
  • 1-1/2 tablespoons of cumin
  • 2-3 tablespoons chili powder
  • ¼ tsp. or red chili flakes
  • 1 tbsp. or more kosher salt

Directions:

  1. To a large pot add onion and sauté for about 2-3 minutes. Add garlic and sauté 1 minute. Add all of the spices and cook stirring for about 30 seconds.
  2. Add bell peppers, carrots and celery and cook for about 5 minutes, or until they just start to soften. Add tomatoes and their juice and bring to a simmer. Once the chili begins to simmer, reduce the heat to medium low. You want the chili to be at a low simmer with the lid off.
  3. Continue to cook the chili, stirring occasionally, for 20 minutes. Add beans, mushrooms and corn and let the chili return to a simmer. Cook for 5 more minutes or until the corn and beans have heated through.
  4. Serve on its own or topped with one (or all!) of the delicious toppings.


Check Out Our Online Recipe Book: www.CafeChatterbox.com

Recipes

Creamy Sesame Balsamic Salad Dressing


This salad dressing is very impressive! It’s actually my first try at using balsamic vinegar. I hear so many people talk about it all the time, but I didn’t really know what all the hype was all about. Although I don’t get the hype it definitely makes this dressing delicious.  It’s easy to make which always gives a recipe high marks in my book and it’s not expensive either!
I found the original recipe online, but I made a lot of changes to it. People complained about it having too much of a vinegar flavor so when I made it I used half the amount of vinegar and to me it was still a little rough on the tongue so I decided to take it down a little with some honey and that seemed to do the trick!
If you are looking for a homemade salad dressing that has a nice balsamic flavor this dressing is the one for you! I think it would be fantastic to marinade chicken breast in!

Ingredients:
  • 1/4 cup balsamic vinegar
  • 1/4 cup tahini (Sesame paste) 
  • 1 tablespoon low-sodium soy sauce 
  • 2 cloves garlic minced
  • 2 tablespoons honey
  • 1/2 teaspoon ground black pepper 
  • 1/4 cup water

Directions:
Add ingredients to a blender, and then blend for 30 seconds. Refrigerate until needed. If dressing is too thick after refrigeration add more water.
Number of Servings: 8 (2 tbsp. per serving)
Nutritional Information:
  • 77 calories per serving
  • 7 carbs 
  • 5 grams of fat 
  • 2 protein
  • 6 sugar
*Nutritional information found on http://www.myfitnesspal.com this information will vary based on the brand of products you use.*

var pfHeaderImgUrl = ”;var pfHeaderTagline = ”;var pfdisableClickToDel = 0;var pfHideImages = 0;var pfDisablePDF = 0;var pfDisableEmail = 0;var pfDisablePrint = 0;var pfCustomCSS = ”;var pfBtVersion=’1′;(function(){var js, pf;pf = document.createElement(‘script’);pf.type = ‘text/javascript’;if(‘https:’ == document.location.protocol){js=’https://pf-cdn.printfriendly.com/ssl/main.js’}else{js=’http://cdn.printfriendly.com/printfriendly.js’}pf.src=js;document.getElementsByTagName(‘head’)[0].appendChild(pf)})();
Check Out Our Online Recipe Book: www.CafeChatterbox.com

Recipes

Mushroom and Rice Casserole

This is a really great recipe that is simple and delicious! It’s very mild flavored so you won’t want to serve anything with it that has too much pep or it will make this recipe look bland.

It’s easy and would be great made on a week night when time is already short, at least it is in our house. We never have enough time during the week so I am always looking for easy recipes.

Ingredients:
  • 2 tbsp. olive oil if desired
  • 6oz chopped onion
  • 2 oz. bell pepper
  • 16 oz. canned mushroom
  • 2/3 cup long grain white rice
  • ½ cup white wine
  • 2 cup vegetable broth
  • 4 cloves roasted garlic (Garlic Roasted Instructions)

Directions:

  1. If you desire to use olive oil to sauté your vegetables heat it until in a saucepan over medium heat; add mushrooms, bell pepper, and onion until tender, if you do not desire to use oil you will want to use a nonstick pan and as your vegetables are beginning to brown a tablespoon of water occasionally to help them along and to prevent them from burning and sticking cook about 5-8 minutes.
  2. Add in vegetable broth, white wine, rice, and roasted garlic. Bring to a boil; reduce heat to medium-low, cover, and simmer until liquid is absorbed and rice is tender, 14 to 16 minutes.


Check Out Our Online Recipe Book: www.CafeChatterbox.com